How to Install and Configure QuikAccount

This guide takes you from download to your first Connect Tally: install the setup, activate your licence, set the Tally connection and the common settings once, and fetch the masters from Tally.

Need help? Call or WhatsApp +91 93584 44502. Free installation and demo support.

Before you start

  • Windows 10 or 11.
  • Microsoft Excel 2016 or later (Microsoft 365, Office 2016, 2019, 2021 or 2024). Excel 2013 or older is not supported – the setup shows a message and stops.
  • TallyPrime (or Tally.ERP 9) installed, with your company open, on the same computer or on a computer in the same network.
  • Internet connection (needed for activation, login and export).

Step 1 – Download the setup

  1. Open www.quick2tally.com and click DOWNLOAD.
  2. Click Download under your edition (Basic, Professional, ECOM, Ultimate or Ultimate Plus).
  3. Fill in your name, e-mail and mobile number and submit. The setup file QuikAccount-<Edition>.msi is downloaded.

Step 2 – Install

  1. Close Microsoft Excel.
  2. Double-click the downloaded .msi file.
  3. On the Welcome screen click Next.
  4. Read the licence agreement, tick I accept the terms in the License Agreement and click Next.
  5. The install folder is shown (default: C:\Users\<your name>\AppData\Roaming\QuikAccount). Keep it or click Change to choose another folder, then click Next and Install.
  6. If Excel is still open, Windows shows Files in Use. Close Excel, then choose to continue.
  7. Click Finish. A QuikAccount icon is placed on the Desktop and in the Start menu.

No admin rights are needed. The setup also adds the QuikAccount folder to Excel’s Trusted Locations, so the macros run without the yellow “Enable Content” bar. Installing a newer version (or another edition) replaces the old one automatically.

Step 3 – Activate your licence

  1. Open QuikAccount from the Desktop icon. The Registration sheet opens with the QuikAccount ribbon tab.
  2. In the Licensing group click Activation.
  3. New user: choose Sign up and enter name, mobile number and e-mail. Existing user: choose Login and enter your registered mobile number or e-mail.
  4. Click Send OTP (or Send by SMS if you prefer an SMS) and enter the OTP you receive. If you have set a password in My Profile, you can log in with the password instead.
  5. After activation the Registration sheet shows your name, licence type, validity, GST API credits and OCR API credits.
Registration tab: Licensing, Tally Settings, Common Settings and Utility groups
  • My Profile – update name, firm, e-mail, GSTIN and address, and set a password.
  • Update License – refreshes validity and API credits from the server (use it after a renewal or after buying credits).
  • Renew License – opens the renewal page.

Step 4 – Enable the Tally connection in Tally

  1. Open TallyPrime and press F1 (Help) > Settings > Connectivity > Client/Server configuration.
  2. Set TallyPrime acts as = Both, Enable ODBC = Yes, and note the Port (normally 9000).
  3. Save and restart TallyPrime, then open your company.

Tally.ERP 9: press F12 > Advanced Configuration and set the same values.
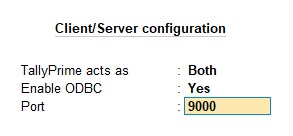
TallyPrime connectivity settings: TallyPrime acts as Both, ODBC enabled, port 9000
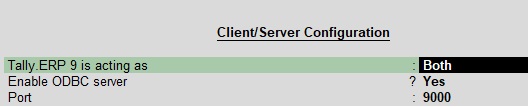
Tally.ERP 9 advanced configuration with ODBC enabled and port 9000

Step 5 – Tally Settings in QuikAccount

On the Registration tab, group Tally Settings:
  • Tally Server Address – localhost when Tally runs on the same computer; otherwise the IP address of the Tally computer.
  • Tally Port – the same port as in Tally (Step 4).
  • Tally Version – select your Tally version.
  • Reset – use it when the connection settings have been changed by mistake and you want to start again.

Step 6 – Common Settings (once, for all sheets)

  • Financial Year – e.g. 2026-27. Every date column in the software accepts only dates of this financial year.
  • Allowed Decimal – the number of decimals allowed in your Tally company (normally 2).
  • Record Exception – Yes / No.
  • Add GST Rate – adds a new rate (e.g. 0.25 or 1.5) to every GST Rate drop-down.

Step 7 – Connect Tally

  1. Make sure Tally is open with the correct company.
  2. Go to the sheet you want to work on and click Connect Tally (first button of the ribbon on every sheet).
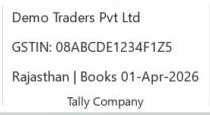
  3. QuikAccount reads the masters (ledgers, stock items, units, voucher types and more) from Tally. The company name, GSTIN and books-from date then show in the Tally Company group.
  4. Click Connect Tally again whenever you create new ledgers or items in Tally.
Tally Company box showing company name, GSTIN, state and books start date

Tally on cloud / no direct connection – Masters from File

  1. In Tally, load the file QuikAccount_Masters.tdl (from the QuikAccount supportfiles folder).
  2. In Tally go to Gateway of Tally > QuikAccount Masters Export, press Alt+E and export as XML.
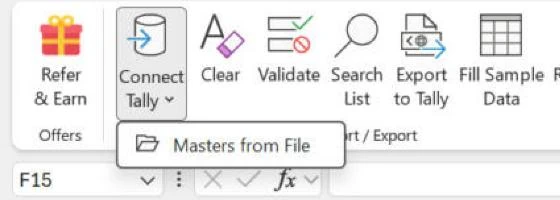
  3. In QuikAccount click the small arrow under Connect Tally and choose Masters from File, then select the XML file.
Connect Tally arrow menu with Masters from File

Uninstall

Start menu > QuikAccount > Uninstall QuikAccount, or Windows Settings > Apps > QuikAccount > Uninstall.

Advantages

One Click Tally Connect

All masters imported with one click on any sheet.

Company always visible

Name, GSTIN, state and books start date shown on the ribbon.

Auto Identify New Masters

Ledgers and items not in Tally are picked up on Validate.

Create New Masters

Missing ledgers and items created in Tally in one click.

Direct Export to Tally

No XML file to import by hand.

Built-in Search

Double-click any drop-down cell or press Ctrl+Shift+S to search.

Trusted by Businesses Across India

Happy Clients

10,000

Transactions Processed

25,15,40,200

Partners

105

Trusted by 10,000+ Tally Users

For Utility, Support and Service

Trusted by Tally users

4.9-star Google rating based on 300+ reviews

Get in touch

Share your details and we will get back to you.